The post Extraction of ElvUI Failed: Solutions and Troubleshooting appeared first on Powercmd.
]]>The Need for Automation
For avid World of Warcraft players, managing the ElvUI interface is an integral part of enhancing their gaming experience. ElvUI, a popular user interface modification, allows players to customize their UI elements, making it a vital tool for tailoring the game to individual preferences. However, keeping ElvUI up-to-date and ensuring its smooth operation can be a time-consuming and tedious task.
- This is where automation steps in as a game-changer. The PSElvUI module is designed to address the pressing need for automation in ElvUI management. It streamlines the entire process, making it effortless for players to maintain and update their UI. Here are some of the key functionalities it offers;
- Check and Update ElvUI: Staying current with the latest ElvUI version is crucial for accessing new features and improvements. PSElvUI simplifies this by automating the update process. Players can easily check for updates and apply them seamlessly through PowerShell;
- Install ElvUI: For those who are new to ElvUI or need to reinstall it, PSElvUI provides a hassle-free installation process. It ensures that the mod is correctly set up on your system without the need for manual downloads and configurations;
- Simple Version Checking: Sometimes, players may only want to verify if a new ElvUI version is available without making immediate changes. PSElvUI caters to this need by offering a straightforward version checking option.
By addressing these key needs, PSElvUI empowers World of Warcraft players to focus on what they do best—gaming—while ensuring their UI remains optimized and up-to-date.
The Motivation
The creation of the PSElvUI module may prompt the question: Why develop this module when there are existing tools available for managing ElvUI? The answer lies in the motivation behind its inception.
The primary motivation for creating PSElvUI was to provide automation and quick accessibility within the World of Warcraft gaming environment. While other tools certainly exist, the author recognized the value of seamlessly integrating ElvUI management into the PowerShell scripting environment, particularly for Windows users.
Here’s why PSElvUI stands out in terms of motivation:
- Automation: Automation is at the core of PSElvUI. It allows players to update, install, or check ElvUI versions with a simple PowerShell command. This level of automation streamlines the process and reduces the need to navigate through multiple interfaces or websites;
- Quick Access: With PSElvUI, players have quick access to ElvUI management without the need to launch additional applications. This level of convenience is invaluable for gamers who want to make on-the-fly adjustments to their UI;
- PowerShell Integration: Being PowerShell-based, PSElvUI seamlessly integrates with the scripting environment that many Windows users are familiar with. It aligns ElvUI management with existing PowerShell workflows, making it a natural choice for those well-versed in PowerShell scripting;
- Furthermore, while the initial focus is on Windows users, the author’s commitment to expanding support to Mac users in the near future demonstrates a dedication to inclusivity and accessibility across different platforms.
In essence, the motivation behind PSElvUI is to enhance the World of Warcraft gaming experience by providing a user-friendly, automation-driven, and platform-flexible solution for ElvUI management.
Installation Guide
Getting started with PSElvUI is a breeze, and this section will guide you through the straightforward installation process. Windows users can quickly install the module directly from the PowerShell Gallery, granting them immediate access to the automation and management capabilities.
Follow these steps to install PSElvUI:
- Run PowerShell as Administrator: To ensure smooth installation, open PowerShell with administrator privileges. This can typically be done by right-clicking the PowerShell icon and selecting “Run as administrator.”
- Install the Module: In the elevated PowerShell window, enter the following command and press Enter.
```powershell

   Install-Module PSElvUI

   ```
This command instructs PowerShell to download and install the PSElvUI module from the PowerShell Gallery.
- Confirmation: During installation, PowerShell may prompt you to confirm that you want to install the module from an untrusted repository. Confirm by typing “Y” and pressing Enter;
- Wait for Installation: PowerShell will now download and install the PSElvUI module along with any required dependencies. The process may take a few moments, depending on your internet connection speed;
- Module Availability: Once the installation is complete, PSElvUI is ready for use. You can verify its availability by typing:
```powershell

   Get-Module -Name PSElvUI

   ```
If the module is listed, you have successfully installed PSElvUI.
Now that PSElvUI is installed on your system, you’re ready to harness its automation capabilities to streamline your ElvUI management within the World of Warcraft gaming environment. Whether you need to update, install, or simply check for new ElvUI versions, PSElvUI is your automation companion, providing a convenient and efficient way to enhance your gaming experience.
For more detailed instructions, consult the README.md.
Using the Module
Now that PSElvUI is installed and ready for action, let’s dive into how to utilize the module effectively. With its user-friendly commands, PSElvUI makes managing ElvUI in World of Warcraft a seamless experience. Here are the available commands and their purposes:
Check for Updates Without Installation: If you’re interested in only verifying whether a new ElvUI version is available without making any changes to your current setup, use the following command:
```powershell

  Invoke-ElvUICheck -OnlyCheck -Verbose

  ```
This command will provide you with information about the availability of updates and whether it’s time to consider an update. Check and Update if a New Version is Available: To both check for updates and automatically update ElvUI if a new version is detected, use the following command:
```powershell

  Invoke-ElvUICheck -Verbose

  ```
This command streamlines the entire update process, ensuring that you’re always equipped with the latest features and improvements. Install ElvUI if it’s Not on Your System: If you’re new to ElvUI or need to set it up on a system for the first time, PSElvUI simplifies the installation process with this command:
```powershell

  Invoke-ElvUICheck -InstallIfDoesntExist -Verbose

  ```
This command handles everything from downloading ElvUI to configuring it correctly on your system, eliminating the need for manual installation steps. With these commands at your disposal, you can effortlessly manage your ElvUI interface, whether you’re keeping it up-to-date, installing it from scratch, or simply checking for the latest version.
Troubleshooting and Feedback
While PSElvUI aims to provide a smooth and trouble-free experience, technical hiccups can occasionally occur. In such cases, the module’s creator is committed to assisting users and continually improving the module. Troubleshooting and feedback are vital components of this ongoing process.
If you encounter any issues or have suggestions for enhancing PSElvUI, here’s what you can do:
- Reach Out: Don’t hesitate to contact the module’s creator when facing difficulties. They are readily available to assist you with any problems you may encounter;
- Feedback Welcome: The author welcomes feedback and suggestions from users. Whether you have ideas for new features, improvements, or simply want to report a bug, your input is valuable;
- Community Support: In addition to direct communication with the creator, consider seeking help or discussing the module within relevant online communities or forums. The collective knowledge of fellow users can often provide solutions and insights.
The commitment to resolving issues and refining the module ensures that PSElvUI remains a reliable tool for ElvUI management within World of Warcraft.
A Deeper Look
For users who are interested in a deeper understanding of how PSElvUI functions behind the scenes, this section offers insights into its inner workings. Beyond its practical applications, PSElvUI serves as a platform for Pester tests—a testing framework for PowerShell. These tests validate the module’s functionality, ensuring it operates smoothly and reliably.
Here’s a closer look at what this means:
- GitHub Repository: The entire source code of PSElvUI, along with associated tests, can be found in its GitHub repository. This open-source approach allows users to explore the codebase and gain insights into its structure and functions;
- Pester Tests: Pester is a testing framework specifically designed for PowerShell scripts and modules. Within the GitHub repository, you’ll find a suite of Pester tests that rigorously evaluate the paths and functions of PSElvUI. These tests play a crucial role in maintaining the module’s reliability;
- By delving into the code and associated tests, users can gain a deeper understanding of how PSElvUI accomplishes its tasks and ensures the seamless management of ElvUI within World of Warcraft. It also offers an opportunity for those interested in PowerShell scripting to learn from real-world code and testing practices;
- PSElvUI is more than just a user-friendly tool; it’s a meticulously crafted module that prioritizes automation, reliability, and user engagement. Whether you’re a casual World of Warcraft player looking for effortless ElvUI management or a PowerShell enthusiast interested in exploring the inner workings of the module, PSElvUI has something valuable to offer.
For World of Warcraft enthusiasts looking to simplify ElvUI management and automate updates, this PowerShell module is a valuable tool. The author’s dedication to providing a seamless experience is evident in its functionality and testing procedures. Explore and enjoy a hassle-free ElvUI experience!
Empowering File Downloads with PowerShell
In the realm of PowerShell, knowledge becomes power, especially when it comes to downloading files. Embracing the command ‘Invoke-WebRequest’ is essential for adept web parsing and efficient file acquisition. But what if there was a tool that could harness the might of PowerShell, making file downloads a modular and effortless experience?
NINJA DOWNLOADER: An Overview
Ninja Downloader operates by executing its main script, ‘download.ps1,’ which accepts the following parameters:
DownloadName
In the realm of PowerShell automation, the concept of `DownloadName` is your key to unlocking the world of modular file downloading. This crucial parameter allows you to specify the name of the script you wish to execute, and it even offers the option to execute all available scripts. These scripts, residing in the `.scripts` directory, are the building blocks of your automation journey.
However, when specifying the script name, remember to exclude the `.ps1` extension. `DownloadName` empowers you to choose precisely which script to run, giving you the flexibility to customize your automation tasks as needed.
OutputType
In the realm of PowerShell automation, flexibility in handling output is paramount. The `OutputType` parameter puts you in control of how your results are delivered. By default, this parameter is set to ‘none,’ but you have a variety of options to choose from:
- XML: Selecting this option will export the results in the form of clixml. It’s a structured and machine-readable format that’s particularly useful for further processing or data sharing;
- CSV: If you prefer your results in a tabular format, choose CSV. This format is human-readable and widely compatible with various software applications, making it an excellent choice for reporting and analysis;
- HTML: For a visually appealing representation of your results, opt for HTML. This format is ideal for generating reports or summaries that can be easily shared and viewed in web browsers;
- All: Why limit yourself to just one format when you can have it all? Selecting ‘All’ will export your results in XML, CSV, and HTML, ensuring you’re prepared for any data-handling scenario.
No matter your preference, the `OutputType` parameter grants you the flexibility to tailor your automation results to suit your specific needs.
DownloadFolder
The `DownloadFolder` parameter adds another layer of customization to your automation experience. This option allows you to define the location where the downloaded files will be stored. If you leave it empty, the tool will default to using `.\downloads` as the storage directory.
What’s particularly convenient is that, if the specified folder doesn’t exist, the tool will create it for you. This means you can seamlessly organize your downloaded files without worrying about manual folder creation. Whether you prefer to keep your downloads neatly organized or simply need a dedicated location for specific files, the `DownloadFolder` parameter gives you the control you need.
UnZip
In the world of file downloads, compressed archives often reign supreme. The `UnZip` parameter introduces a touch of automation magic by automatically attempting to extract zip archives after they’ve been downloaded.
Here’s how it works: Once a zip file is downloaded, the tool takes the initiative to unzip it. The extracted files are then neatly placed in a dedicated directory, following a naming convention that includes the file’s name and a timestamp. This way, you don’t have to worry about manual extraction, and your downloaded files are ready for use. With the `UnZip` parameter, you can streamline your workflow even further, especially when dealing with a multitude of downloadable files, some of which may be zipped for convenience.
ListOnly
The `ListOnly` parameter offers a different perspective on automation. It serves as a switch, and when activated, it provides you with a comprehensive list of all available script names within the tool. Alongside each script name, you’ll also receive its respective path.
This feature is invaluable for those moments when you need a quick reference or want to explore your automation options. It’s like having a catalog of scripts at your fingertips, allowing you to make informed choices about which scripts to execute without diving into the directory structure manually.
Downloading a File
Now that you’re equipped with a solid understanding of the parameters at your disposal, let’s explore how to put them to practical use by downloading files. Within this versatile automation tool, several default scripts come bundled, ready to assist you in various tasks. Let’s take a closer look at these default scripts:
- Ccleaner.ps1: This script offers the ability to manage and optimize your system using CCleaner, a popular system maintenance tool;
- Chrome.ps1: Need to install or update Google Chrome? This script has you covered, making sure you’re always using the latest version of the web browser;
- FireFox.ps1: For users of Mozilla Firefox, this script handles both installation and updates, ensuring you’re up-to-date with the latest features and security patches;
- Java.ps1: Java is a fundamental component of many applications. With this script, you can effortlessly download and update Java to keep your system compatible with Java-based software;
- Skype.ps1: For communication needs, Skype is a go-to application. This script simplifies Skype installation, sparing you the hassle of manual downloads and setups;
- template.ps1: Aspiring automation creators, this one’s for you. Template.ps1 serves as a blueprint for creating custom download scripts. It provides a framework you can build upon, customizing your automation to suit your unique requirements.
These default scripts are designed to address common automation needs, whether it’s software updates or system maintenance. By utilizing the power of PowerShell and these predefined scripts, you can streamline tasks and ensure that your systems are always running efficiently.
So, whether you’re looking to optimize your system with CCleaner, stay up-to-date with the latest web browsers, or create custom automation scripts, this versatile tool has you covered. Armed with the `DownloadName` parameter and an array of predefined scripts, you have the tools to automate with precision and ease. Automation just got a whole lot more accessible and efficient.
To use these scripts:
- Open PowerShell and navigate to the project/script’s root directory;
- Run the following code: `$downloadResults = .\download.ps1 -DownloadName ccleaner`;
- Access results in the `$downloadResults` variable.
Downloading All Files
To download all files using every script in the ‘.\scripts’ folder:
- Open PowerShell and navigate to the root directory;
- Run: `$downloadResults = .\download.ps1 -DownloadName all -Verbose`
Output Types
This script supports multiple output formats, all timestamped with date and time:
CSV
To output results as a CSV, run: `$downloadResults = .\download.ps1 -DownloadName all -OutputType csv`
HTML
For HTML output: `$downloadResults = .\download.ps1 -DownloadName all -OutputType html`
XML
To generate XML output: `$downloadResults = .\download.ps1 -DownloadName all -OutputType xml`
ALL
For all output formats: `$downloadResults = .\download.ps1 -DownloadName all -OutputType all`
Crafting Custom Download Scripts
You can create your own scripts to use with Ninja Downloader. The provided template in the ‘.\scripts’ folder serves as an example. Ensure your script returns an object with the following properties:
- DownloadName (string, file name);
- Content (byte array, file contents);
- Success (boolean);
- Error (string, any error received).
Example Script Creation
Suppose you want to download ElvUI. Follow these steps:
- Save the template as ‘elvui.ps1.’;
- Customize the script to match ElvUI’s web structure;
- Run: `.\download.ps1 -downloadName elvui`.
Explore the GitHub Repository
Find this project on GitHub for additional resources. Download the code as a ZIP file and ensure to unblock ‘download.ps1’ and scripts within the ‘.\scripts’ folder.
What’s Next?
With Ninja Downloader, you can:
- Create custom download scripts;
- Schedule tasks to download the latest versions of tools automatically;
- Explore the full script help by running: `Get-Help .\download.ps1 -Full`
The Quest for Menus in PowerShell
In the early stages of their PowerShell journey, our intrepid script writer pondered how to make life easier for those who would use their creations. What started as a simple script eventually evolved into a comprehensive module, a tool for the entire team.
Within this module resided a plethora of functions: some for onboarding new hires, others for handling terminations, and many more for general Active Directory user management and Exchange wizardry. However, with over six functions in the mix, it was time to introduce a basic menu system for the Helpdesk crew, simplifying their interactions with PowerShell and the module.
Setting the Stage
To build a menu, our scriptwriter first needed to present options to the user. The trusty `Write-Host` command was their tool of choice for this task. To enhance the visual experience, they opted to define the `$foregroundColor` variable globally, allowing for future color adjustments, because, let’s face it, who doesn’t want a bit of color in their scripts?
Another variable, `$ncVer`, stored the version number. Now, let’s construct that menu:
```powershell

Write-Host `n"Ninja Center v" $ncVer -ForegroundColor $foregroundColor

Write-Host `n"Type 'q' or hit enter to drop to shell"`n

Write-Host -NoNewLine "<" -ForegroundColor $foregroundColor

... And so on

```
But the scriptwriter’s newfound favorite feature was `-NoNewLine`. This clever addition enabled them to alternate colors on the same line, enhancing the aesthetic appeal of the menu. A little flair goes a long way, after all!
Escape strings like `t` (horizontal tab) and `-n` (new line) played their part in maintaining the menu’s tidiness, ensuring it didn’t become an overwhelming wall of text.
Taking Action
Now that the menu was in place, it was time to capture user input and spring into action! This called for a combination of `Read-Host` and a `Switch` statement:
```powershell

$sel = Read-Host "Which option?"

Switch ($sel) {

    Handle various menu options...

}

```
Each option led to a specific action. For example, selecting “A3” prompted additional input gathering to prepare variables for a function call. This approach allowed for a tailored and user-friendly experience, particularly valuable for Helpdesk scenarios.
Putting It All Together
The menu system was wrapped up neatly into a function:
```powershell

function Load-NinjaCenter {

    [cmdletbinding()]

    param()

    The entire menu...

}

```
This function could be placed in a custom module, readily accessible whenever needed. A simple call to the function would bring the menu back to life.
Learning from Experience
Sharing scripts in this manner revealed the fascinating truth: people will find inventive ways to challenge your code. This process not only helped identify script weaknesses but also served as a superb learning opportunity. And so, the scriptwriter’s journey through PowerShell continued, armed with newfound menu-building skills and a deep appreciation for the art of user interaction in scripting.
In conclusion, the journey of building a basic text menu system in PowerShell, as explored in this narrative, sheds light on the iterative and creative nature of script development. Our intrepid scriptwriter’s quest to simplify and enhance the user experience within PowerShell modules led to the creation of a versatile and user-friendly menu system.
The key takeaways from this journey are multifaceted:
- User-Centric Scripting: The scriptwriter’s realization that scripting isn’t just about writing code but also about delivering a smooth, user-centric experience is a vital lesson. Building menus and interfaces can greatly enhance script utility, especially when catering to diverse users with varying degrees of expertise;
- Aesthetic Considerations: The script’s use of colors, tabs, and newlines demonstrates the importance of aesthetics in scripting. Well-designed menus not only improve functionality but also make scripts visually appealing and easier to navigate;
- Adaptability and User Feedback: The inclusion of a dynamic menu structure that adapts to user choices and the ability to handle diverse inputs exemplifies the importance of robust scripting. It’s crucial to anticipate user behavior and provide clear feedback to enhance usability;
- Continuous Learning: The scriptwriter’s journey highlights that scripting is an ongoing learning process. Sharing scripts exposes them to real-world challenges and helps identify areas for improvement. Scriptwriters should embrace feedback and continually refine their work;
- Scripting for Collaboration: The menu system’s development for a Helpdesk team showcases the collaborative nature of scripting. Building tools that empower others to efficiently use PowerShell is a valuable contribution to any organization.
In summary, the creation of a PowerShell menu system is not just a technical endeavor but an artful fusion of functionality and user experience. It reflects the scriptwriter’s commitment to making the powerful capabilities of PowerShell accessible to a wider audience. This journey underscores the iterative and dynamic nature of scripting, where feedback, adaptability, and user-centric design play pivotal roles. As the scriptwriter continues their adventures in PowerShell, they carry forward valuable lessons in scripting craftsmanship and the art of user interaction.
The post Extraction of ElvUI Failed: Solutions and Troubleshooting appeared first on Powercmd.
]]>The post Raspberry Pi 3 SSH WiFi Setup Guide appeared first on Powercmd.
]]>Install Raspbian
- Navigate to [Raspberry Pi’s official Raspbian download page and obtain the latest ZIP-compressed Raspbian Buster Lite image.
- To write this image to an SD card or SSD (the device from which the Raspberry Pi will boot), acquire a suitable application like balenaEtcher here. Note: Raspberry Pi 4 does not currently support USB booting; therefore, you’ll need an SD card for boot media, as explained here https://www.raspberrypi.org/documentation/hardware/raspberrypi/booteeprom.md.
- Launch Etcher or your chosen application.
- Attach the drive/SD card to your computer (for instance, an SSD with a USB converter). It’s worth mentioning that Pi’s USB ports may sometimes experience voltage drops affecting connected SSDs. While this issue is usually resolved with the provided converter, you might consider a powered USB hub if problems persist. Raspberry Pi 3B+ supports automatic USB booting, but for Raspberry Pi v3, refer to this https://www.raspberrypi.org/documentation/hardware/raspberrypi/bootmodes/msd.md.
- In Etcher, select “Select image.”;
- Now, choose “Select drive,” selecting the recently attached drive/SD card, and click “Continue.”;
- Finally, click “Flash!”
Setup WiFi Network Join on Boot
To configure the Pi to connect to your WiFi network on boot, follow these steps:
- If the boot volume isn’t visible on your computer, safely disconnect and reconnect the SSD or SD card;
- You should now see the boot volume on your machine;
- Using your preferred text editor, create a file named “wpa_supplicant.conf.” The following content should be placed in this file (replace the content in quotes with your SSID and password):
```plaintext

ctrl_interface=DIR=/var/run/wpa_supplicant GROUP=netdev

update_config=1

ap_scan=1

fast_reauth=1

country=US

network={

  ssid="Your network's SSID"

  psk="Your network's password/psk"

  id_str="0"

  priority=100

}

```- Save the file and copy it to the boot volume.
Enable SSH on Boot
To enable SSH on boot, follow these steps:
- Create an empty file named “ssh” (without an extension) using a text editor like Notepad. For this example, Terminal on OSX will be used:
```plaintext

cd ~/Desktop/

touch ssh

cp ssh /Volumes/boot

```- Safely eject the boot volume and attach it to your Raspberry Pi.
First Boot and Setup
Now, it’s time to boot the Raspberry Pi, connect the storage device (SD card or SSD with USB converter), and configure it:
As we approach the final stages of setting up your Raspberry Pi for action, here are the crucial steps to ensure your headless Pi is ready to roll:
- Attach the Storage Device and Power On: Begin by connecting your chosen storage device, be it an SD card or SSD with a USB converter, to your Raspberry Pi. Once securely attached, power on your Pi, initiating the boot-up process;
- Access Your Router’s Settings: The next step involves navigating to your router’s settings. Look for a section related to attached devices or DHCP client lists. This is where you’ll discover your Raspberry Pi. Refresh the list if necessary until you spot a device named “raspberrypi.” For those in need of further assistance locating their headless Pi, the official Raspberry Pi documentation provides a helpful guide;
- SSH into the Pi: With the IP address of your Raspberry Pi in hand, it’s time to establish a secure connection using SSH. If you’re using Windows, you can follow this guide. However, for our example, we’ll use the Terminal application on OSX. Run the following command, replacing the IP address with the one you obtained:
```plaintext

ssh [email protected]

```
Should you be prompted to trust the host, simply select “yes.” The default username is “pi,” and the initial password is “raspberry.”
- Change the Default Password: Security is paramount. To enhance the security of your Raspberry Pi, it’s imperative to change the default password. Use the “passwd” command to initiate this process. You’ll first be asked for the current password (which is “raspberry”), followed by the opportunity to set and confirm your new password. Note that as you type, characters will not be visible for security purposes.
By diligently following these steps, your Raspberry Pi is now primed and secure, ready to take on a world of projects and possibilities. Enjoy your journey into the realm of this versatile and compact computing marvel!
To wrap up
In conclusion, the Raspberry Pi stands as a remarkable and versatile computing solution that can be acquired for a modest $35 USD. This guide has illuminated the process of installing Raspbian, configuring WiFi, and enabling SSH on this compact computer, all without the need for a dedicated monitor, keyboard, or mouse.
- By following the steps outlined in this guide, users can unleash the full potential of their Raspberry Pi. They can transform it into a powerful tool for various applications, from DIY projects to home automation and beyond;
- The installation of Raspbian, the official Raspberry Pi operating system, is the initial step toward harnessing this tiny computer’s capabilities. The guide emphasizes the importance of selecting the appropriate image and using a reliable tool, like balenaEtcher, for writing the image to an SD card or SSD;
- Setting up WiFi and enabling SSH on boot pave the way for remote access and control, making the Raspberry Pi a headless, efficient computing solution. The guide ensures that users can establish a secure connection and customize their Pi’s settings easily.
In summary, this guide empowers enthusiasts, tinkerers, and professionals alike to dive into the world of Raspberry Pi with confidence. With these fundamental steps, users can embark on countless exciting projects and explore the vast potential of this pocket-sized computer. The Raspberry Pi community continues to innovate, making this versatile device a valuable addition to any tech enthusiast’s toolkit.
The post Raspberry Pi 3 SSH WiFi Setup Guide appeared first on Powercmd.
]]>The post PowerShell Tip: Mastering the -f Format Operator appeared first on Powercmd.
]]>What is the -f Format Operator?
Exploring string manipulation techniques in PowerShell reveals an array of options, with the -f format operator standing out as a particularly versatile choice. This operator efficiently processes values to its right, beginning with a 0 index, mirroring the behavior of PowerShell arrays, and neatly separating them with commas.
Let’s illustrate this with different examples:
Setup
For our examples, let’s set up the following variables:
[array]$formatArray = @('you', 'values', 'them.')

$user = (Get-ChildItem Env:\USERNAME).Value

$date = Get-Date
Using the -f Operator
Example 1
In this example, we utilize the -f operator to construct a string:
“Your user name is {0}, and the time is [{1:HH}:{1:mm}:{1:ss}]” -f $user, $date
Returns:
Your user name is Mike, and the time is [12:54:44]
Example 2
We can use the -f operator with an array. Since it starts indexing at 0, we can feed it an array, like so:
"These {1} go where {0} place {2}" -f $formatArrayReturns:
These values go where you place them.
As you can see, it’s a powerful tool for dynamically constructing strings based on variable values.
Expanding Usage
Here’s an additional example from a logging module where we append the date to a log name when the $addDate argument is set to $true:
if ($addDate) {

    if ($logName.Contains('.')) {

        $logName = $logName.SubString(0, $logName.LastIndexOf('.')) + "_{0:MM-dd-yy_HHmm}" -f (Get-Date) + $logName.Substring($logName.LastIndexOf('.'))

        Write-Verbose "Adding date to log file with an extension! New file name: $logName"

        Write-Verbose ""

    } else {

        $logName = $logName + "_{0:MM-dd-yy_HHmm}" -f (Get-Date)

        Write-Verbose "Adding date to log file. New file name: $logName"

        Write-Verbose ""

    }

}
Additional Formatting Options
You can enhance string formatting further by specifying more options, such as:
- {1:HH}:{1:mm}:{1:ss}: This enumerates the values specifically for the 24-hour hour, minutes, and seconds returned by $date;
- There are various other options available for different placements, spaces, and even returning different numeric values.
This versatility makes the -f format operator a valuable tool for string manipulation in PowerShell.
Conclusion
The -f format operator in PowerShell is a fundamental yet incredibly versatile tool for string manipulation. This quick tip has demonstrated its basic use, showcasing how it can construct dynamic strings by treating values on its right as an array. Whether it’s formatting dates, combining variables, or customizing string output, the -f operator empowers users to create precise and efficient scripts. Its ability to handle various formatting options adds a layer of sophistication to PowerShell scripting, making it an essential skill for anyone working with this powerful automation and scripting language.
The post PowerShell Tip: Mastering the -f Format Operator appeared first on Powercmd.
]]>The post PowerShell Array of Arrays: Efficient Data Management appeared first on Powercmd.
]]>Creating Arrays
To give birth to an array, one can adopt various methods. The first involves the usage of the `@()` syntax:
```powershell

$values = @("One", "Two", "Three", "Four", "Five")

```
Here, we define an array named `$values` with the elements “One,” “Two,” “Three,” “Four,” and “Five.”
```powershell

$values

$values.GetType()

```
Resulting in:
```

One

Two

Three

Four

Five

IsPublic IsSerial Name                                     BaseType

True     True     Object[]                                 System.Array

```
Another approach entails setting an array with comma-separated values:
```powershell

$values = "Six", "Seven", "Eight", "Nine", "10"

```
Resulting in:
```

Six

Seven

Eight

Nine

10

```
You may also create an array with a specified type, like so:
```powershell

[int[]]$values = 6, 7, 8, 9, 10

```
Resulting in:
```

6

7

8

9

10

```

Or opt for the `[array]` type:

```powershell

[array]$values = 11, 12, 13, 14, 15

```
Resulting in:
```

11

12

13

14

15

```
Adding and Modifying Array Elements
Once an array is in existence, items can be added or altered. For instance:
```powershell

$values = @("One", "Two", "Three")

```
To ascertain the number of items within the array:
```powershell

Write-Host "Items in array $($values.Count)"

```
To append an item:
```powershell

$values += "Four"

```
And again, to inspect the count:
```powershell

Write-Host "Items in array $($values.Count)"

```
To alter an item by its index:
```powershell

$values[0] = "Five"

```
Resulting in:
```

One

Two

Three

Items in array 3

One

Two

Three

Four

Items in array 4

Five

Two

Three

Four

```
Accessing Arrays
To access the treasures stored within an array, one must employ the index, commencing with 0:
```powershell

[array]$values = 1, 2, 3, 4, 5

```
To unveil the third item:
```powershell

Write-Host "Item at index 2: $($values[2])"

```
Resulting in:
```

Item at index 2: 3

```
Navigating Arrays via Loops
The index approach remains relevant when traversing arrays through loops. An array of names, for instance:
```powershell

$nameArray = @("Erik", "Penny", "Randy", "Sandy", "Toby", "Uma", "Vicky", "Will", "Xavier", "Yvette", "Zach")

```
Can be explored using a `for` loop:
```powershell

for ($i = 0; $i -lt $nameArray.Length; $i++) {

   Write-Host $nameArray[$i]

}

```
Resulting in:
```

Erik

Penny

Randy

Sandy

Toby

Uma

Vicky

Will

Xavier

Yvette

Zach

```
To wrap up
In conclusion, arrays stand as versatile data structures capable of storing collections of items, whether they are of the same or different types. This exploration has illuminated various methods of creating arrays, from using the `@()` syntax to specifying types, along with techniques for adding, modifying, and accessing their elements. Additionally, the power of loops in navigating arrays has been showcased. With this understanding, one can harness the potential of arrays to organize and manipulate data effectively in PowerShell.
The post PowerShell Array of Arrays: Efficient Data Management appeared first on Powercmd.
]]>The post File Writing in PowerShell: Practical Examples appeared first on Powercmd.
]]>Understanding File Output in PowerShell
Writing files in PowerShell is essential for tasks like log generation, configuration management, or data export. PowerShell provides several ways to write data to files, and the method you choose depends on your specific requirements.
Here are some common scenarios where you might want to write files in PowerShell:
| Use Case | Description |
|---|---|
| Logging | Writing logs for scripts and automation tasks to track execution, errors, or other relevant information. |
| Configuration Files | Creating and updating configuration files for your scripts or applications. |
| Data Export | Exporting data from PowerShell scripts to formats like CSV, JSON, or plain text. |
| Reporting | Generating reports or summaries of system information or script execution results. |
Let’s dive into some practical examples of how to accomplish these tasks using PowerShell.
Mastering Data Writing Methods in PowerShell

A multitude of techniques are available for composing data into files, each catering to different use cases and requirements. These methods encompass a wide array of approaches and tools, allowing you to tailor your data writing process to suit the specific needs of your projects.
Add-Content
To append content to a file, execute the following script:
Add-Content -Path (Join-Path -Path $env:TEMP -ChildPath “test1.txt”) -Value “This is just a test”
Add-Content -Path (Join-Path -Path $env:TEMP -ChildPath “test1.txt”) -Value “This is just another test”
Get-Content (Join-Path -Path $env:TEMP -ChildPath “test1.txt”)
Result:
This is just a test
This is just another test
In this example, you can observe that the Add-Content command will generate the file automatically if it doesn’t already exist. Furthermore, it appends the value to a new line.
However, if you prefer not to append the value on a new line, you can take a different approach.
Add-Content -Path (Join-Path -Path $env:TEMP -ChildPath “test2.txt”) -Value “Test1”
Add-Content -Path (Join-Path -Path $env:TEMP -ChildPath “test2.txt”) -Value “Test2” -NoNewline
Add-Content -Path (Join-Path -Path $env:TEMP -ChildPath “test2.txt”) -Value “Test3” -NoNewline
Result:
Test1
Test2Test3
Out-File
Out-File is most conveniently employed when used in conjunction with a pipe symbol (“|”).
“Lorem ipsum dolor sit amet, consectetur adipiscing elit” | Out-File -FilePath c:\temp\output1.txt
Get-Content C:\temp\output1.txt
Result:
Lorem ipsum dolor sit amet, consectetur adipiscing elit
In the absence of any additional parameters, Out-File will overwrite the file. To append text, we can utilize the -Append parameter.
“Lorem ipsum dolor sit amet, consectetur adipiscing elit” | Out-File -FilePath c:\temp\output2.txt
“Ut enim ad minim veniam, quis nostrud” | Out-File -FilePath c:\temp\output2.txt -Append
Get-Content C:\temp\output2.txt
Result:
Lorem ipsum dolor sit amet, consectetur adipiscing elit
Ut enim ad minim veniam, quis nostrud
Conclusion
PowerShell provides several methods for writing files, making it a versatile tool for automation, data manipulation, and reporting. Whether you need to create text files, append to existing ones, export data to CSV or JSON formats, PowerShell has you covered. By mastering these techniques, you can harness the full power of PowerShell for your scripting and automation needs, making your IT tasks more efficient and productive.
The post File Writing in PowerShell: Practical Examples appeared first on Powercmd.
]]>The post Practical PowerShell: Demonstrating If/Else Statements appeared first on Powercmd.
]]>Expanding on the concept of the If/Else Statement
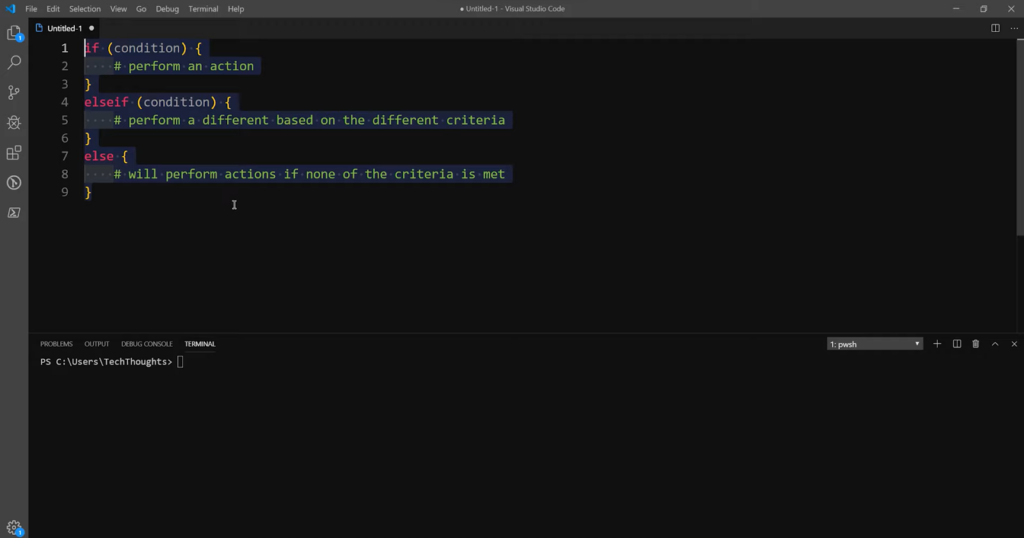
The If/Else statement within the realm of PowerShell serves as a pivotal tool for facilitating decision-making processes. Its primary function lies in evaluating a specified condition, and depending on the condition’s outcome (either true or false), it directs the script to execute distinct sets of code blocks. To gain a deeper grasp of its functionality, let’s delve into the fundamental structure that underlies an If/Else statement in PowerShell:
if (condition) {
    # Code to execute if the condition is true
} else {
    # Code to execute if the condition is false
}
Let’s dive into some real-world examples to illustrate how to use if/else effectively in PowerShell.
PowerShell Conditional Logic: If, Else, and Else If
Leveraging if and else statements in PowerShell is a user-friendly and approachable task, even for those new to scripting. It’s essential to emphasize that within PowerShell, you have the flexibility to utilize an if statement as a standalone construct, allowing you to execute specific code when a particular condition is met. This versatility grants you the ability to design scripts that respond dynamically to various scenarios, making PowerShell a powerful tool for automation and decision-making in a wide range of tasks. Whether you are a novice or an experienced scripter, mastering the use of if and else statements in PowerShell can significantly enhance your scripting capabilities and streamline your workflow.
$value = 5

if ($value -gt 1) {
    Write-Host "value is greater than 1"
}

Result:

value is greater than 1


You have the flexibility to use an if statement in combination with either a single else statement or an else if statement.

$value = 5

if ($value -gt 10) {
    Write-Host "value is greater than 10"
}
else {
    Write-Host "value is $value"
}

if ($value -gt 10) {
    Write-Host "value is greater than 10"
}
elseif ($value -lt 10) {
    Write-Host "value is less than 10"
}
else {
    Write-Host "value is 10"
}

Result:

value is 5
value is less than 10
Conclusion
The if/else statement is a fundamental part of PowerShell scripting. It enables you to make decisions, validate input, and control the flow of your scripts based on conditions. By understanding and using if/else effectively, you can create more powerful and flexible PowerShell scripts for various tasks in your Windows environment. Experiment with these examples to gain confidence in your PowerShell scripting skills, and you’ll be well on your way to automating tasks with precision and control.
The post Practical PowerShell: Demonstrating If/Else Statements appeared first on Powercmd.
]]>The post Illustrating PowerShell: Multidimensional Arrays appeared first on Powercmd.
]]>Understanding Multidimensional Arrays
In PowerShell, an array is a collection of values that can be of different types, such as integers, strings, or objects. A multidimensional array, as the name suggests, is an array that has more than one dimension. In essence, it’s like a table with rows and columns, where each cell can hold a value.
The most common multidimensional array is a two-dimensional array, which resembles a grid or a table. You can think of it as an array of arrays, where each element of the outer array is itself an array. In a two-dimensional array, you can access elements using two indices: one for the row and one for the column.
In the world of multidimensional arrays, we encounter two distinct categories: jagged arrays and true multidimensional arrays. These two array types offer unique characteristics and functionalities that cater to various programming scenarios and requirements. By understanding the differences between them, you can harness their power more effectively in your coding endeavors.
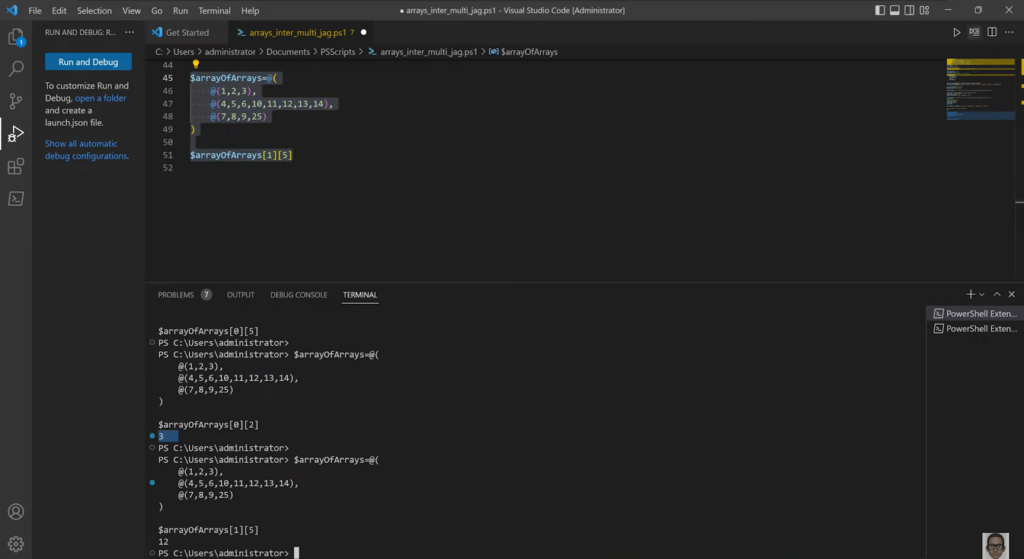
Jagged Arrays
Jagged arrays are among the most commonly used array structures in programming. Their versatility lies in their ability to accommodate varying dimension sizes within the same array, making them a cost-effective choice for many applications. Explore the advantages and applications of jagged arrays in this informative guide.
$array = @(1, 2, (1, 2, 3), 3, 4, (10, 11, 12), 5)
$array[0]
$array[1]
$array[2]
$array[2][0]
$array[2][1]
$array[5]

Result:
1
2
1
2
3
1
2
10
11
12
True Multidimensional Arrays
True multidimensional arrays resemble matrices in their functionality and structure. When creating a true multidimensional array, you define its size upfront, providing a structured and ordered way to store and manipulate data. Delve into the world of true multidimensional arrays and discover their similarities to matrices in this informative exploration.
$array = New-Object 'object[,]' 5,8
$array[2,5] = 'Hello'
$array[3,7] = 'World!'
$array

Result:

Hello
World!

You can contrast the aforementioned with the following:

[ ][ ][ ]    [ ]    [ ]
[ ][ ][ ]    [ ]    [ ]
[ ][ ][ ]    [ ]    [ ]
[ ][ ][ ]    [ ]    [ ]
[ ][ ][ ]    [ ]    [ ]
[ ][ ][Hello][ ]    [ ]
[ ][ ][ ]    [ ]    [ ]
[ ][ ][ ]    [World][ ]
Conclusion
Multidimensional arrays in PowerShell are valuable tools for working with structured data. They allow you to organize and manipulate data in a way that makes sense for many real-world scenarios. Whether you’re dealing with grids of numbers, game boards, or complex data structures, mastering the use of multidimensional arrays can significantly enhance your PowerShell scripting capabilities. Experiment with these examples and explore more advanced scenarios to become proficient in working with multidimensional arrays in PowerShell.
The post Illustrating PowerShell: Multidimensional Arrays appeared first on Powercmd.
]]>The post Building Linux Terminal Programs and Utilities appeared first on Powercmd.
]]>We will talk about the interpreted software platforms available on most systems – Python, Perl, awk, Bash. In addition, you will need a Make system for building code.
The code a programmer writes is often divided into .h header files and .c source code files.
The gcc compiler does the following:
When you compile -S, the source code is converted from .c to .s assembly code.
When -c is compiled, the assembly code is transformed into .o object code.
The -l link is a reference to the standard libraries for creating the executable.
By default gcc combines the above steps to create an executable.
gcc hello.c – creates a.out, not .o or .s files.
Make build system
This system automates the compilation of multiple source files in a complex project, arranges the dependent actions, and executes them in order. It then reads the configuration from a “build” file, usually called a Makefile. As a result, the Makefile acts as a software component of the project’s build process.
The process of the make command
make will read data from the Makefile and run commands to build the final target. For example, in the Makefile shown above, make will run commands for rules 2-4, followed by rule 1:
gcc -c dep1.c # create dep1.o
gcc -c dep2.c # create dep2.o
gcc -c main.c # create main.o
gcc -o an_exe main.o dep1.o dep2.o -lm
Linux terminal utilities
To run a command at a specific time, use at:
at 17:00
at> log_days_activities.sh # sometimes you can abbreviate: at> prompt [Ctrl+D]
at offers the use of keywords such as now, noon, today, tomorrow as well as different options such as hours and days which can be specified with a + character.
at noon
at now + 1 year
at 3:08pm + 1 day
at 3:01 p.m. December 19, 2018
Use cron if you want to set how often you want to run commands.
The Linux terminal utility cron allows you to set up periodic runs through a crontab file, which controls the process and determines what needs to be run and when. Entries can be created in any file and added to the system using the crontab command as follows:
echo ’15 18 30 6 * find /home -mtime +30 -print’ > f00
crontab f00 # add the previous command to the system crontab
crontab -l # list of crontab entries
crontab -r # delete crontab entries
The output of the cron command will be done via mail (alternatively it can be redirected to a file with >).
The post Building Linux Terminal Programs and Utilities appeared first on Powercmd.
]]>The post Linux terminal commands appeared first on Powercmd.
]]>Basics in Linux Terminal
The following commands will give you a better understanding of the system:
- id – if you want to get information concerning your account;
- w – to find out who is currently logged in (-f – to find out where you’re logged in from);
- lsblk – if you want to open a list of block storage devices;
- lscpu – displays information about the processors;
- lstopo – provides access to the topology of the hardware display software (hwloc, hwloc-gui packages are required);
- free – shows the amount of free and already used memory (use also free -g);
- lsb_release -a – if you want to get information about data distribution;
- Note for PS0: use Ctrl+C to deactivate irrelevant commands. As for PS1: some commands may not be available. To check which ones, type which .
Working with processes
Start by creating a list of the processes by name, process ID number, etc. (the commonly used sign of aux status).
Keep in mind that POSIX, GNU and BSD implementations of software threads, and that they differ in function and usage. The above implementations differ in different options: POSIX (-), GNU (-), BSD (no dashes).
The process indicators in this system are: top, htop, atop.
Lower the priority of a process using nice. For example like this:
- nice -n 19 tar cvzf archive.tgz large_dir
- To kill a process type kill . This command is used to terminate zombie processes or to end hung sessions.
The following are the Linux terminal commands which will save you the trouble:
- man nano – this command gives access to the help pages, organized by sections. That is one page per section. For example: 5 passwd #5th section;
- wget –help is a very handy command that will give you a quick help on the syntax;
- info curl – allows you to get information about the command (in this case curl);
- /usr/share/doc – use in your browser. In case of a problem, keep in mind that README files usually contain information and examples of commands. You can view them with your browser.
Working with files
You will need the following commands for files of various types and sizes:
- cat for relatively short files:
- cat – for relatively short files;
- less – reads text in small pieces, not all of it:
- less /etc/ntp.conf;
- more – for long files;
- tail -f – used to view the growing file in the interactive code window.
What can you do with binary files? There are not really many options:
- strings – the command will output the file’s print-ready strings;
- od – allows you to print the file in octal format;
- cmp – allows you to compare files byte-for-by-byte.
If you need to compare text files with each other, type the following commands:
- comm – the sorted files will be line by line;
- diff – allows you to tell the difference line by line. This command is the most commonly used because of its rich set of options.
Internet at the command line
Use the following commands when working in a Linux terminal with Internet resources:
- curl – usually used for downloads from the Internet:
- curl -O http://www.gutenberg.org/files/4300/4300-0.txt
- curl ifconfig.me #quickly finds your ID
- wget – similar command:
- wget http://www.gutenberg.org/files/4300/4300-0.txt
- wget https://kubernetespodcast.com/episodes/KPfGep{001..062}.mp3
- lynx allows you to use a fairly user-friendly text browser.
Convenient in this case means that you:
- can finally get rid of the constantly popping up ad windows;
- solve the problem of slow/hang-up internet, for example: lynx text.npr.org;
- be able to access local html pages, such as those found with /usr/share/doc;
- w3m and links are additional text browsers: w3m lite.cnn.com.
The post Linux terminal commands appeared first on Powercmd.
]]>The post Session management: tmux appeared first on Powercmd.
]]>Ttmux is one of the Linux terminal tools, more precisely the terminal multiplexer, which allows you to create multiple permanent terminals within a single login. In other words, tmux is a program which allows you to have several “tabs” in one terminal window.
tmux will be useful in the following cases:
- if compilation or other similar operation is likely to take a long time in the long run;
- for interactive multitasking;
- in unusual cases, such as when programming in pairs;
- in order to save time and perform several operations at once.
A quick guide to tmux
Standard tmux workflow:
- tmux new -s s1 # start a new session
Ctrl+B :detach allows to interrupt the session, logout, go home.
You can log back in later. To do this you need:
- tmux a-t s1
Additional useful tmux commands:
- Ctrl+B ( – return to previous session;
- Ctrl+B ) – switch to the next session;
- tmux ls – get a list of all the sessions;
- tmux kill-session -t s1 – end of session.
Direct collaboration in tmux:
user1
- tmux -S /tmp/collab
- chmod 777 /tmp/collab
user2
- tmux -S /tmp/collab attach
Creating parts of a window and synchronizing them
- tmux new -s s2 – start a new session;
- Ctrl+B ” – horizontal division;
- Ctrl+B % – vertical separation;
- Ctrl+B :setw – to enable and disable synchronization;
- Ctrl+B o – scroll windows;
- Ctrl+B x – remove active windows.
The post Session management: tmux appeared first on Powercmd.
]]>